Friday, April 23, 2021

How do I combine all vCards into a single vCard on my PC?

 ​When iExplorer exports your contacts to a Windows PC, it transfers each one of your contacts as a single vCard file which is a universal file format for contacts. If you'd like to combine all of your contacts into a single vCard to make it easier to import into Outlook or another address book application, here's how to combine multiple vCards into a single vCard file in Windows:

  1. Go to the top of your C:\ drive and create a folder named "contacts".
  2. Copy all of your vCards into this new folder. 
  3. Open up the Run app by searching for "run". 
  4. In the Run app, type "CMD" which will open the command prompt. 
  5. Type exactly "cd c:\contacts" and hit Enter (don't forget the space after cd).
  6. Then, type in "copy *.vcf allcontacts.vcf" and hit Enter.
  7. Look inside that contacts folder for the new allcontacts.vcf which will contain all of your contacts inside that single vCard file.

(Note: you can create that folder on your Desktop or any directory if you want, but be sure to enter the full file path in step 5. For your Desktop, it would be C:\users\\Desktop.)


References - https://helpdesk.macroplant.com/

Export Excel to vCard


How Can I Convert Excel Contacts to vCard?

Now, the main topic comes how to convert Excel contacts to vCard? So, the answer is there are two methods to export Excel contacts to vCard file format one is a manual approach and the other is an automated solution. It is recommended to follow the given instructions sequentially and carefully to avoid any kind of data loss issue.

Method One. Export Excel to vCard Manually

You can convert Excel file contacts to vCard using your Windows OS but, keep this thing in mind that this method will not let you create a single VCF for all your Excel contacts. Hence, as a result, you will get several vCards (depends on the number of Excel contacts).

Alert – This method is lengthy, time-taking and some of you may find it complicated. If so, then you can go for the second approach.

Step 1. Convert Your Excel File to CSV

If your contacts are saved within a CSV file already then, you can skip this step and begin with step two. If you’ve saved your contacts in some other Excel file format like .xls, .ods, etc., then, follow the guidelines given below:
• Open your Excel file and click on Offline
• Select Save As >> Other Formats
• Browse destination location to save output CSV
• Save this file as Text CSV (*.csv)

After this, your Excel file will be converted into CSV file format.

Step 2. Import CSV to Your Windows Contacts
Now, you need to import the resultant CSV file in your Windows Contacts to convert contacts from Excel to vCard. Below is how to do this:
• Click on Start and choose Contacts
• Hit a click on Import option
• Select CSV (Comma Separated Values)

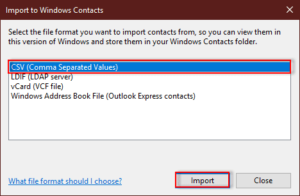
• Click on Import >>Browse
• Select the CSV file from your system
• Click Next and map all the fields
• Eventually, click on Finish
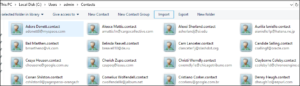
Let the import process completed successfully and you will find that all your CSV contacts are saved as vCard in Windows Contacts.

Step 3. Export vCard from Windows Contacts
Finally, you have to export vCard contacts from your Windows and following are the guidelines to do this:
• Press the Ctrl button and choose all the required contacts
• Click on Export and select vCards (folder of .VCF files)
• Hit the Export button and browse a destination location for vCards
• Click OK
And then, you will find that all your CSV contacts are saved as vCard in Windows Contacts. After this, you can import and access these vCards from vCard supported email client/ other applications.

Method Two. Export Excel to vCard Automatically

XLS to VCF Converter is an expert program to convert unlimited Excel contacts to vCard file format without any data loss. No matter in which Excel file extension you’ve saved your contacts, you can convert them into a single or multiple vCards. Following are the guidelines to use this software to convert contacts from Excel to vCard:
• Download and run Excel to vCard Converter. Click on Browse
• Select the vCard file from your computer and the tool will load it
• After previewing your Excel contacts, click on Next
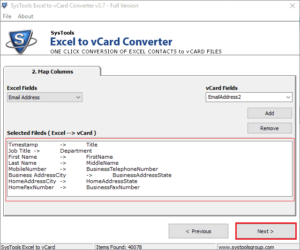
• Now, map all the Excel Fields with vCard fields

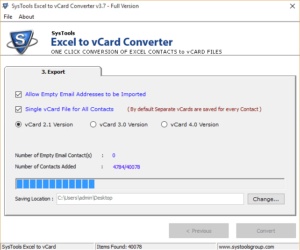
• Click on Next and select the vCard version and other desired options
• Hit the Convert button and Excel to vCard conversion will begin right after this

Once convert Excel contacts to vCard process gets completed successfully, you can import and access these vCard files from various desktop-based/ web-based email clients, cloud platforms, Androids, iOS, etc.

This is how to convert Excel contacts to vCardfile format so, be smart and do not let your contacts sleep in your Excel files, export Excel to vCard quickly.

References - https://tweakyourbiz.com/


Excel 2010 Concatenate formula appears instead of value

 Select the cell. Format the cell as "General". (Right-click the cell, select Format Cells, and choose "General.") Delete the "=" at the beginning of your formula and hit Enter.

Thursday, March 19, 2020

Mac Stuck on Loading Screen/ Spinning wheel macbook pro startup/ How to downgrade your Macbook

A. Loading Screen spinning wheel macbook pro startup


Image result for spinning wheel macbook pro startup


 What is the reason for the MacBook being stuck on the loading screen?

While updating the system - 

i. The internet might be put off.
ii. The system might be forced to shut down while it was updating the OS.
iii. The software updates that go on in the background before the booting, might have been forcefully interrupted either by i or ii above. 


1. Refer B mentioned below to initially troubleshoot and check if it works. 

If it doesn't work we have a couple of alternatives - 

i. To reinstall a fresh copy from the start-up disk.
ii. If we are not having a start-up disk and like a particular version of macOS X, we can borrow it locally.
iii. To restore from a rescue CD/ DVD, if we want to retrieve our data back. 
iv. To restore from a time machine back up if we have created one.
v. To create a rescue disk and restore our HDD, if we want to retrieve our data back. 


I will explain the v. one for OS X Mavericks, as the other four are pretty much self - explanatory - 

How to create a rescue disk - 
We can use our flash drive as the rescue disk. As per the documentation, at least 8GB of free space is required for running OS X Mavericks -

1. We need to have a bootable OS X Mavericks, either in a flash drive or a DVD drive that may have come with the Macbook that had been purchased. If both the above aren't there,, will let you know how to deal with this soon.

2. Assuming we are having a bootable media, we need to enter the

Recovery Mode.

The following article is taken from - https://www.howtogeek.com/189104/troubleshoot-your-mac-with-these-hidden-startup-options/

Recovery Mode provides various graphical tools for working with your Mac. From here, you can reinstall macOS, restore your computer from a Time Machine backup, or use the Disk Utility to repair, wipe, and partition your Mac’s internal disks.

Press Command+R as your Mac boots to access Recovery Mode. If necessary, you’ll be asked to connect to a network so your Mac can download the appropriate recovery software. You can then choose your language and use the graphical tools here.


*******End of the article taken from the mentioned source.


3. Click on Disk Utility.

i. Put the Bootable Flash drive in one of the USB Slots. We call it Flash Drive 1.
ii. I had problems while placing the other flash drive, let's call it Flash Drive 2, that I wanted to use as a hard disk in the other USB slot because both the slots were placed very close to each other.
iii. Thus, I had to use a USB extension cable.
iv. After doing this, when I intended to make the Flash Drive 2 as the start up disk, the disk utility gave me a message, that OS X cannot be installed in this disk.
v. Then, what I needed to do is erase the Flash Drive 2 with the disk utility and convert it from FAT32/ NTFS to HFS+. Disk utility does all of this for us. We need to specify the format as MAC OSX Journaled and format it completely. Now, are good to go.
vi. In the disk utility itself, there is a restore option and choose the source as Flash Drive 1 and destination as Flash Drive 2.
vii. After doing the needful, it may take an hour or two for the Flash Drive 2 to be formatted and most importantly if the above process is not interrupted after the complete write process takes place, it keeps writing again and again on the Flash Drive 2. So, once we are done with the writing process remove the Flash Drive 1 before the second writing process begins.
viii. Now, the Flash Drive 2 is ready as a Hard - Disk.


The following article is taken from - https://www.howtogeek.com/189104/troubleshoot-your-mac-with-these-hidden-startup-options/

Choose Another Startup Disk with the Startup Manager

To boot from a specific device, press and hold the Option key while booting your Mac. You’ll see the Startup Manager appear. From here, you can choose to boot from different connected hard drives, USB flash drives, network locations, and other boot devices.
To skip the Startup Manager and boot straight from a removable device—for example, a CD, DVD, or USB drive—instead of its internal drive, press and hold C. To boot directly from the network with Netbook, press and hold N instead.
choose-boot-device-on-mac-with-startup-manager
*******End of the article taken from the mentioned source.


4. As illustrated above, we have to keep pressing the option key and boot from Flash Drive 2.

5. Once connected, you can log in and operate normally and take the back up from the home folder of the main hard drive where the OS X Mavericks had been installed. One typical problem encountered is that as the external disk is connected, the internal disks take some time around 3 to 5 minutes sometimes to show up. If we connect any other external disk, the internal disks tend to show up quickly.

6. After the back up is over, we can use the time machine to restore the disk that had the spinning wheel problem. Here, it may happen that while restoring the disk it may show us that there are no primary disks. So, we may need to format the disk after the back up of our primary hard disk is taken using the disk utility. It may be worthwhile to have a partition in our main disk as a rescue partition and maintain a backup using time machine so that we can restore it as and when required. One word of caution is that the time machine deletes our old data if the disk is full,, without asking our consent. There is no way to undo the deletion. One thing that can be done to overcome the above situation is that we can take the necessary backups as per our hard disk space and put the time machine off. 

The following article is taken from - https://recoverit.wondershare.com/mac-tips/restore-mac-stuck-on-loading-screen-mac.html

B. How to Restore Mac Stuck on Loading Screen 


Mac stuck on loading screen is a common issue that can soccer due to several reasons. The fix does exist but it will take a few minutes of your time. Learn how to solve it once for all and how you can continue using your computer once again. Below are the detailed steps of all the things you must do and also explanations why you should use them. At the moment, all we can say is that this problem occurs as a side effect when the operating system finds an error.

Part 1. Causes of Mac Stuck Loading Screen

There are several reasons why Mac computer can display loading screen and cannot pass it. The reasons are explained below.
  • Corrupted operating system is the most common problem. This happens when some files are missing from the hard drive and operating system can’t locate them. As such, it won’t be able to complete the checks and boot.
  • Damaged hard drive is another common cause. In this case scenario, a hard drive might be damaged and it will have bad sectors. Files on those sectors will be unavailable which brings us back to the precious cause.
  • The third cause is unsuccessful system upgrade. In rare cases, a system will fail to update all the apps and all drivers which will cause the Mac to freeze on the loading screen.
  • In some cases, this issue can appear as a side effect of damaged hardware. Usually, peripherals are the ones that are damaged and not working properly. OS won’t be able to boot in order to prevent further damage.
  • RAM module failures are known to cause this problem as well. In this case scenario, a RAM module will have to be replaced or both, if both are malfunctioning.

Part 2. How to Restore Mac Stuck on Loading Screen

Mac not responding is probably the first phrase you are going to search with Google. Before you rush to the Apple repair center, make sure you have tried all of the steps included below. Chances are high that one of them will work and your Mac will be ready to be used within minutes and you can continue with your usage.

1. Restart the Mac

When this issue occurs you won’t be able to shut down Mac. The solution is to hold the power button for a few seconds until the computer shuts down. Once you are done, turn it back on and see if the problem solved. If is still there, you can move to the next step.
restore-mac-stuck-on-loading-screen-1

2. Reboot into Safe Mode

To start Mac in safe mode, you need to press Shift and press the power button, without releasing the Shift button. Hold it until your Mac reaches loading screen and then release it. You will see boot mode. Make sure safe mode is selected. Confirm the task and let the computer start in safe mode.
restore-mac-stuck-on-loading-screen-2

3. Reset Mac SMC

To reset System Management Controller or SMC you will have to press shift, control, option and power button for 10 seconds. Release the buttons and turn on your Mac. This step is mandatory for Intel based machines which are frozen on the loading screen.
restore-mac-stuck-on-loading-screen-3

4. Reset NVRAM/PRAM

If your Mac is stuck on Apple logo or you see a progress bar but there is no actual progress, try resetting the NVRAM. This reset usually fixes the problem. To use it, turn off the computer and immediately start it while holding option, command, P and R buttons. Once it started to release the buttons.
restore-mac-stuck-on-loading-screen-4

5. Reboot in Recovery Mode

To start mac in recovery mode, all you have to do is to hold command and R buttons and turn on the computer. It will start in recovery mode and offer you several options which can be used to resolve the main problem. The process is the same for all Mac computers.
restore-mac-stuck-on-loading-screen-5

6. Reboot in Single User Mode

This type of booting is helpful when the Mac computer is stuck at progress bar at 100%. To boot into single user mode, all you have to do is to press command and S keys and turn on the computer. Release them once the computer starts booting. MacBook pro stuck on loading screen can usually be fixed with this process.
restore-mac-stuck-on-loading-screen-6

7. Reinstall Mac OS X

If nothing else works, you will have to reinstall the operating system. To do that, press command and R keys while turning on the computer. You will see the Utility screen. Choose the Reinstall Mac OS and follow the steps. In order to install it, you will need an internet connection.
Computer will download the operating system from the official servers and install it. The time for this process depends on the version of the operating system your computer will download (it will always download the latest supported OS) and the speed of your internet connection.
restore-mac-stuck-on-loading-screen-7

Create a bootable USB Stick on Windows in the HFS format using Transmac


We can use the Transmac software from the acute systems - 
https://www.acutesystems.com/scrtm.htm


TransMac from Acute Systems is Windows software that can copy and manage files and folders on Apple drives and devices, including Mac-formatted hard drives, flash drives, and other storage devices, as well as open and burn disc images and .dmg and .sparseimage files. It's shareware that you can try for free for 15 days. Recent updates include an improved open file dialog, speed enhancements, and Windows 8 compatibility.


Win is Win and Mac is Mac, and never the twain shall meet: is that what you've heard? Well, maybe there's some truth to it, especially when it comes to device compatibility. While Mac users are probably justified in claiming their OS and machines are better at handling the other side's stuff, there's certainly room for improvement at both ends.
You can install TransMac as a ZIP file or an executable file; the installed program is identical in either case. The program's installer offers several setup options, too, such as file associations. TransMac's user interface is plain but easy to use, thanks in part to what is possibly the most common and efficient design ever, the classic Explorer-style toolbar/sidebar/main window layout. TransMac offers its subtle variations on the theme, with toolbar icons that stay hidden but outlined until needed, a tree-view disk menu in the left-hand sidebar, and draggable column headings in the main file list. The Options menu includes separate PC and Mac settings, plus General Settings that include selections for one of TransMac's extras, the ability to burn discs. We always expect a decent Help file with shareware, and TransMac has one, including a Quick Start guide with plenty of screenshots and, especially useful, a Troubleshooting Guide.
We ran TransMac on a Windows 7 PC, and then attached a Mac-formatted removable hard drive as our second device. Basically, TransMac works like File Explorer. We could cut, copy, paste, drag and drop, delete, and zip or unzip Mac files and folders to and from our PC, and vice versa. There are some quirks, which is only to be expected when Mac and Win get together. But TransMac makes them play nicely for a change.
Editors' note: This is a review of the trial version of TransMac 10.4.


The following article is taken from - https://ubuntu.com/tutorials/tutorial-create-a-usb-stick-on-macos#1-overview

Create a bootable USB Stick on macOS

1. Overview

With a bootable Ubuntu USB stick, you can:
  • Install or upgrade Ubuntu, even on a Mac
  • Test out the Ubuntu desktop experience without touching your PC configuration
  • Boot into Ubuntu on a borrowed machine or from an internet cafe
  • Use tools installed by default on the USB stick to repair or fix a broken configuration
Creating a bootable USB stick is very simple, especially if you’re going to use the USB stick with a generic Windows or Linux PC. We’re going to cover the process in the next few steps.

Apple hardware considerations

There are a few additional considerations when booting the USB stick on Apple hardware. This is because Apple’s ‘Startup Manager’, summoned by holding the Option/alt (⌥) key when booting, won’t detect the USB stick without a specific partition table and layout. We’ll cover this in a later step.

2. Requirements

You will need:
  • A 2GB or larger USB stick/flash drive
  • An Apple computer or laptop running macOS
  • An Ubuntu ISO file. See Get Ubuntu for download links

3. Prepare the USB stick

To ensure maximum compatibility with Apple hardware, we’re going to first blank and reformat the USB stick using Apple’s ‘Disk Utility’. But this step can be skipped if you intend to use the USB stick with only generic PC hardware.
  • Launch Disk Utility from Applications>Utilities or Spotlight search
  • Insert your USB stick and observe the new device added to Disk Utility
  • Select the USB stick device (you may need to enable the option View>Show All Devices) and select Erase from the tool bar (or right-click menu)
  • Set the format to MS-DOS (FAT) and the scheme to GUID Partition Map
  • Check you’ve chosen the correct device and click Erase

4. Install and run Etcher


To write the ISO file to the USB stick, we’re going to use a free and open source application called Etcher. After downloading this and clicking to mount the package, Etcher can either be run in-place or dragged into your Applications folder.
By default, recent versions of macOS block the running of applications from unidentified developers. To side-step this issue, enable ‘App Store and identified developers’ in the ‘Security & Privacy’ pane of System Preferences. If you are still warned against running the application, click ‘Open Anyway’ in the same pane.
screenshot
screenshot

5. Etcher configuration

Etcher will configure and write to your USB device in three stages, each of which needs to be selected in turn:
  • Select image will open a file requester from which should navigate to and select the ISO file downloaded previously. By default, the ISO file will be in your Downloads folder.
  • Select drive, replaced by the name of your USB device if one is already attached, lets you select your target device. You will be warned if the storage space is too small for your selected ISO.
  • Flash! will activate when both the image and the drive have been selected. As with Disk Utility, Etcher needs low-level access to your storage hardware and will ask for your password after selection.
screenshot

6. Write to device

After entering your password, Etcher will start writing the ISO file to your USB device.
The Flash stage of the process will show progress, writing speed and an estimated duration until completion. This will be followed by a validation stage that will ensure the contents of the USB device are identical to the source image.
When everything has finished, Etcher will declare the process a success.
Congratulations! You now have Ubuntu on a USB stick, bootable and ready to go.
screenshot
Warning: After the write process has completed, macOS may inform you that ‘The disk you inserted was not readable by this computer’. Don’t select Initialise. Instead, select Eject and remove the USB device.


7. Boot your Mac

If you want to use your USB stick with an Apple Mac, you will need to restart or power-on the Mac with the USB stick inserted while the Option/alt (⌥) key is pressed.
This will launch Apple’s ‘Startup Manager’ which shows bootable devices connected to the machine. Your USB stick should appear as gold/yellow and labelled ‘EFI Boot’. Selecting this will lead you to the standard Ubuntu boot menu.
screenshot

Finding help


If your Mac still refuses to boot off your USB stick you may find it easier to boot and install off an Ubuntu DVD instead. See our How to burn a DVD on macOS for further details.
Alternatively, if you feel confident using the macOS command line, see the community documentation on How to install Ubuntu on MacBook using USB Stick for a more manual approach.
If you want to install Ubuntu, follow our install Ubuntu desktop tutorial.
Finally, if you get stuck, help is always at hand:


Tuesday, September 13, 2016

Transfer/ Import Contacts to Nokia PC Suite

You would be forgiven to think that importing contacts from your Google address book into Nokia PC Suite would be an easy and straight forward task. Google Contacts has 3 export options: a proprietary Google CSV, a standard Outlook CSV and the vCard format. Likewise Nokia PC Suite allows importing Outlook CSV and vCard formats. Having recently tried both methods though, neither worked.

The Outlook CSV format failed with some error message and informed me that no contacts were imported. The error message gave no clue as to why. The vCard format on the other hand would import only a single contact.

After a little bit of digging around I found that the vCard .vcf file exported by Google Contacts is a composition of all your contacts, but Nokia PC Suite expects only one contact per .vcf file. A quick Google search reveled just the tool for this, vCardSplit. Using it is pretty simple: just dump your contacts.vcf file into a folder, say C:\temp, dump the vCardSplit.exe into the same folder, open a command prompt and type vCardSplit.exe contacts.vcf.

Back in Nokia PC Suite, go to Contacts and select import, then hold the shift-key and multiple-select all the .vcf contact files (Ctrl+A doesn't work because Nokia decided to snazzy up their interface and code their own file-select dialog). Click import and you should get all your contacts.

However, in my case I noticed none of the phone numbers showed up! Names and emails were there, but no numbers. The solution to this is to open up the contacts.vcf file you exported from Google and replace all instances of "VERSION=3.0" with "VERSION=2.1" and also replace all instances of "TYPE=" with "" (i.e. nothing). Then run the split tool again and import the contacts into Nokia PC Suite again. This time all info should come through (haven't done extensive checking, but all numbers and emails appear to be there, not sure about groups, titles and other details).

Friday, July 1, 2016

How to unlock document locked by unknown user?

Applicable especially for the Linux Users - 

When you open a file LO locks it to prevent another user editing it at the same time. It does this by placing a lock file in the folder with the file you are editing, and then deletes the lock file when you close the document. When a crash happens, the lock file can be left behind. If your file is MyFile.odt the lock file will probably be .~lock.MyFile.odt# and it will be a hidden file. On Linux the . at the beginning makes it hidden. With Dolphin on a KDE Linux it is Alt+. With Lubuntu, you can go to - View -> Show Hidden. Once you can see the lock file, delete it.

Thursday, April 21, 2016

Disable auto-refresh tabs in Chrome Desktop

It's a relatively new parameter which has been turned ON by default in the new release. Chrome Team is calling it "Tab Discarding". This may happen if there are many Tabs open and Chrome is running out of Memory. According to their documentation, "Tabs are now sorted from most interesting to least interesting. The least interesting tab may be discarded if we run out of physical memory." I suppose least interesting would translate to those tabs which weren't accessed in a while.
Though they are trying to help us free some RAM, however, this 'feature' totally ruins the tab if you don't want its contents to refresh due to some reason, like a YouTube video you paused at a particular location. Or wanted to go back to some top headlines on the homepage of CNN, which you had glanced at earlier and now you want to go back to them, but as soon as you click the tab, this 'feature' auto refreshes the page, updating the headlines. List goes on and on. I also had some Amazon tabs open and had specifically wanted not to have the page update, because it had some particular images and design elements displayed that I wanted to refer later, but when I got back to those pages, the 'Tab-discarding' feature 'auto refreshed' all of them, replacing them with the current version of the pages, totally devoid of whatever I wanted to refer to. And for those who suggest it is probably Amazon's auto-refresh, no, Amazon doesn't auto-refresh product pages, I have had pages remain open for many days and they would never update unless I clicked Refresh.
Now, let's get back to the Solution
To see the 'Discarded Tabs', type this in the Address Bar: chrome://discards/
To actually disable:, type in your address bar: chrome://flags, then disable this flag: #automatic-tab-discarding (Turn it to 'Disabled' from 'Default')
Simple solution to a highly unproductive and frustrating issue. That's it. You can stop pulling your hair out now :)

Source - superuser.com